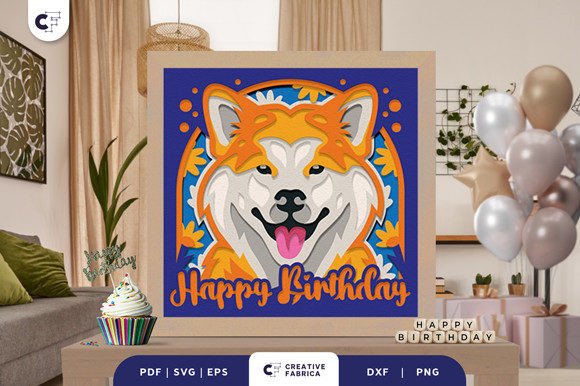
Birthday Cat 3D Light Box Paper Cut
Looking for a unique and charming way to celebrate a birthday or express your love for cats? The Birthday Cat 3D Light Box Paper Cut is the perfect choice. This creative project combines artistry and simplicity, allowing you to craft an elegant, cat-themed lightbox with minimal effort. Whether you're a seasoned crafter or just starting out, this design brings together intricate details and user-friendly steps to make something truly special.
A Charming Blend of Art and Craft
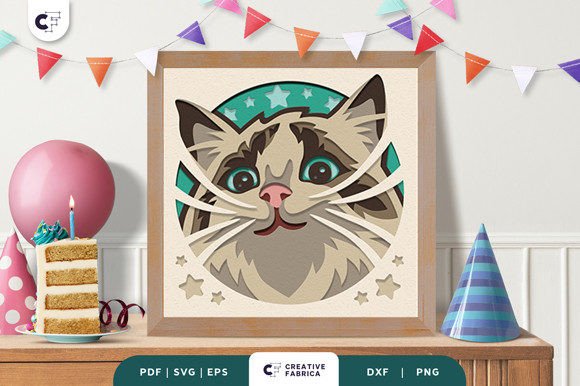
The Birthday Cat 3D Light Box Paper Cut uses layered paper techniques to create a lifelike 3D effect. At its heart is a large, detailed cat head image that serves as the focal point of the decoration. With nine layers of precision-cut paper, each layer adds depth and texture, transforming flat shapes into a dimensional masterpiece when stacked and illuminated.
What makes this design stand out is its accessibility. You don't need advanced skills or expensive equipment—just some basic tools like glue, tape, a paper base, and pre-cut file pieces. Once assembled, it becomes a beautiful lightbox that can brighten up any room with its whimsical charm and soft glow.
Why Choose This Design?
This lightbox appeals to a wide audience. For cat lovers, it's a personal and artistic expression of their affection. For those looking for a thoughtful gift, it’s an excellent option for birthdays, housewarmings, or even pet anniversaries. Educators might find it useful in classroom activities to teach students about design, color theory, and patience. Small business owners or entrepreneurs could use it as part of a product line or custom gift service, adding value through handmade uniqueness.
Its practicality is also worth noting. Unlike many crafts that require hours of work or specialized training, this one can be completed in a short time with clear, step-by-step instructions. And because it's made from cardstock, it’s durable enough to last while still being lightweight and easy to store or transport.
How It Works: A Simple Assembly Guide
Creating your Birthday Cat 3D Light Box Paper Cut involves three main steps:
- Cut all the layers: Each design comes with multiple layers that are already pre-cut in various formats such as SVG, PDF, EPS, PNG, and DXF. These files are ideal for use with most paper cutting tools, including Cricut or Silhouette machines.
- Stack them in order: Once you have all the layers, arrange them according to the provided instructions. Proper layering is key to achieving the right visual effect and ensuring the final piece looks cohesive and balanced.
- Attach to the frame: Secure the stacked layers onto a sturdy frame. This not only holds everything together but also provides a base for the LED light source, which will illuminate your creation from within.
With these simple steps, you can turn what starts as a set of paper pieces into a stunning decorative item. The result is a warm, glowing lightbox that feels handcrafted and personalized, no matter who assembles it.
Realistic Use Cases for the Lightbox
The possibilities for using the Birthday Cat 3D Light Box Paper Cut are endless. Here are a few realistic examples where it shines:
- Home Decor: Place it on a shelf or nightstand in your living room or bedroom. Its soft illumination and cute design add a cozy touch to any space.
- Office Ambiance: Add a dash of personality to your workspace. It can serve as a desk lamp alternative or a decorative accent that lifts your mood during long hours.
- Gift Idea: Customize it with colors or materials that match the recipient's style. It’s a heartfelt present for cat enthusiasts, especially if paired with a small treat or toy for their feline friends.
- Event Decoration: Use it at a cat-themed party, baby shower, or birthday celebration to create a memorable and eye-catching centerpiece.
- Educational Project: Teachers can incorporate it into art classes or STEM projects to help students learn about spatial design and the properties of light.
These applications highlight how versatile the design can be across different environments and purposes. It’s not just a craft—it’s a functional piece of art that fits naturally into both personal and professional settings.
Important Considerations Before You Start
Before diving into your project, there are a few things to keep in mind to ensure success:
- Paper Quality: The design features Encore Cardstock 80 lb cover (216 gsm), known for its durability and vibrant colors. If you’re purchasing additional supplies, consider matching this quality for consistency. You can find compatible materials at the 12×12 Cardstock Shop.
- Color Variance: While the preview images show a specific look, the actual finished product may vary slightly due to lighting sources and the natural variation in paper tones. Always allow for a bit of creativity in choosing colors that suit your aesthetic.
- Layer Order: Follow the stacking instructions carefully. Misplacing a single layer can affect the overall 3D illusion and the visual impact of the final piece.
- Illumination Options: Make sure to choose an appropriate light source. Some prefer LED tea lights for safety, while others opt for battery-powered lamps for convenience.
By understanding these factors upfront, you’ll avoid common pitfalls and enjoy a smoother crafting experience. Think of it as setting yourself up for success from the very first cut.
Beginner-Friendly Tips for Success
If you're new to paper cutting or 3D art, here are a few tips to help you get started:
- Use a consistent lighting setup while working with your machine to ensure accurate cuts.
- Test assemble a small section before gluing everything together. This helps identify any issues early.
- Choose colors that complement each other for a more visually appealing result. Pastels or metallic shades can add a festive flair for birthdays.
- Label each layer as you cut to avoid confusion during assembly.
These small adjustments can make a big difference in the final outcome. Remember, practice makes progress—don’t worry if your first attempt isn’t perfect. Every project is a learning opportunity!
Where to Get the Files and What to Expect
The Birthday Cat 3D Light Box Paper Cut is available in several digital formats, including SVG, PDF, EPS, PNG, and DXF. These files are designed to be used with common paper crafting tools, making it easy to bring the design to life. Each kit includes nine layers and a template for assembling them into a frame of size 20.32×20.32 cm.
Once you download the files, you can begin experimenting with color combinations and materials. The flexibility of the design allows you to tailor it to your own preferences or the interests of the person you’re creating it for. It’s a great way to infuse creativity into your space or share a meaningful gift.
Final Thoughts on Crafting and Gifting
The Birthday Cat 3D Light Box Paper Cut offers a delightful balance between simplicity and sophistication. It's not just a craft—it's a way to connect with others through shared interests in art, animals, and celebration. Whether you're making it for yourself, a friend, or a client, the end result is always something to be proud of.
So next time you're planning a birthday surprise, decorating a new room, or looking for a unique DIY project, consider giving this adorable cat-themed lightbox a try. With just a little time and care, you can create something that sparkles with both light and love.