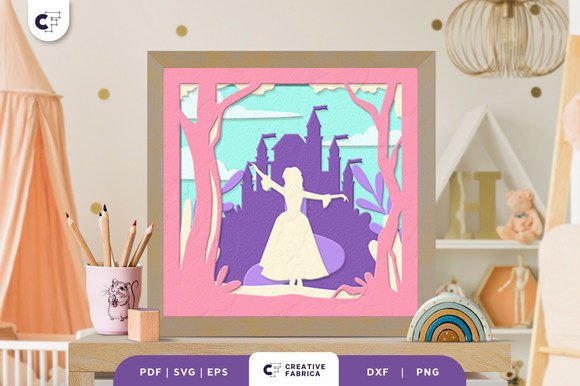
Fairy Castle 3D Paper Cutting Light Box: A Creative and Versatile DIY Project
Hello, crafters! If you're looking for a unique and enchanting way to bring some magic into your home or gift-giving, the Fairy Castle 3D Paper Cutting Light Box is an excellent choice. This layered paper cutting template offers both artistic satisfaction and functional beauty, making it a favorite among hobbyists and professional artists alike. Whether you’re a seasoned crafter or just starting out, this project is designed to inspire creativity while delivering stunning results.
What Is a 3D Paper Cutting Light Box?
A 3D paper cutting light box is a decorative piece crafted from multiple layers of cut paper that are stacked together to form a three-dimensional image. When illuminated with LED lights, the shadows cast by each layer create a mesmerizing effect, transforming flat paper into a lifelike scene. The Fairy Castle design is particularly popular due to its intricate details and whimsical theme, which appeals to a wide range of audiences—from children to fantasy lovers.
The Layers of the Fairy Castle Design
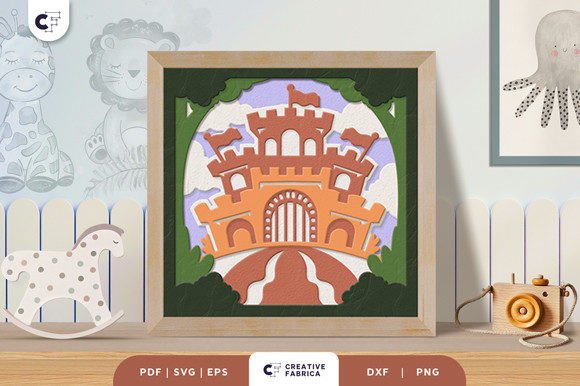
This particular template consists of six layers, allowing for a richly detailed composition. Each layer is carefully cut to represent different parts of the castle, such as turrets, windows, and walls. When assembled correctly, these layers work in harmony to produce a realistic illusion of depth and dimension. The overall size of the design is 20.32×20.32 cm, making it compact yet impressive enough to stand out as a decor item or gift.
How It Works: From Template to Finished Product
Creating a 3D paper cutting light box starts with selecting the right materials and tools. While specialized cutting machines like Silhouette or Cricut can streamline the process, they aren't required. The template is available in various formats—SVG, PDF, EPS, PNG, and DXF—to suit different crafting needs. These files allow for precise replication of the design, whether you're using digital tools or hand-cutting with an art knife and scissors.
Materials You'll Need
- Cardstock: The recommended cardstock is Encore Cardstock 80 lb cover (216 gsm), known for its durability and smooth finish.
- Cutting Tools: Either a Silhouette or Cricut machine, or a good quality art knife and cutting mat.
- Adhesive: Glue or double-sided tape for assembling the layers.
- LED Strips: Optional but highly recommended for achieving the magical glowing effect typical of light boxes.
- Frame or Box: To hold the layers together and provide a structure for display.
Assembly Process
Once you've cut all six layers, the next step is to assemble them. Begin by aligning the first two layers with a slight gap between them, then secure with glue or tape. Repeat this process until all layers are stacked. For the light box version, insert LED strips between the layers before final assembly. The lighting enhances the shadows and adds a soft glow that brings the fairy castle to life.
Why Choose the Fairy Castle Design?
There are several reasons why the Fairy Castle stands out among other 3D paper cutting projects. First, its square format makes it easy to frame and display. Second, the design’s complexity ensures that even experienced crafters will find it challenging and rewarding. Lastly, the theme resonates with many people, especially those who enjoy fantasy, folklore, and fairytale-inspired decor.
Purpose and Significance
At its core, the Fairy Castle 3D paper cutting light box serves as a creative expression tool. It allows individuals to explore their artistic side through precision cutting and assembly. Additionally, the finished product can be used in various ways:
- Framed Wall Art: Hang it as a statement piece on your wall for a touch of elegance and whimsy.
- Light Box: Add LED strips and place it on a shelf or nightstand to create ambient lighting with a fantasy twist.
- Gift Item: Package it beautifully and give it as a personalized gift for birthdays, holidays, or special events.
Modern Applications and Relevance
In today's fast-paced world, there's a growing appreciation for handmade and personalized items. The Fairy Castle 3D paper cutting light box fits perfectly into this trend. Here’s how it connects with modern lifestyles:
Home Decor
With the rise of bohemian and eclectic interior design styles, unique decor items like this have become more desirable. The light box adds a warm, magical ambiance to any room, especially when placed near a window or above a bed. Its soft illumination helps create a calming environment ideal for reading or relaxing.
Education and Creativity
For educators and parents, this project offers a hands-on learning experience. It teaches attention to detail, spatial awareness, and the basics of 3D design. In classrooms, it can serve as part of an art curriculum or a STEM activity involving geometry and engineering principles.
Business and Entrepreneurship
Artisans and small business owners can use this template to create custom products for sale. The versatility of the design means it can be adapted for different markets, such as baby showers, fantasy-themed parties, or even corporate gifts for clients. With the included SVG file, production can be scaled efficiently using digital cutting machines.
Common Misunderstandings About 3D Paper Cuttings
Despite their popularity, some people still misunderstand what 3D paper cuttings involve. Let's clear up a few myths:
Myth 1: It Requires Advanced Skills
Reality: While patience and precision are important, the templates are designed to be user-friendly. Beginners can achieve great results with practice, and there are plenty of online tutorials to guide you through the process.
Myth 2: It’s Just for Kids
Reality: Although the fairy theme may appeal to children, the craftsmanship involved is enjoyed by people of all ages. Many adults appreciate the aesthetic and emotional value of such creations, often using them in personal spaces or as collectibles.
Myth 3: It’s Time-Consuming
Reality: Depending on your pace, the entire project can take anywhere from a few hours to a day. However, the end result is worth the effort, especially when you see the design glowing in your living room or admired by friends and family.
Practical Tips for Success
To ensure your Fairy Castle 3D paper cutting light box turns out beautifully, consider these tips:
- Use High-Quality Cardstock: As mentioned earlier, the recommended cardstock provides the best balance of rigidity and ease of cutting.
- Maintain the Aspect Ratio: If resizing the SVG file, always keep the original aspect ratio to preserve the design's integrity and proportions.
- Work in a Well-Lit Area: Good lighting helps with precision during the cutting and assembly stages.
- Test the Lighting Before Final Assembly: Place LED strips between the layers to check the glow effect and make adjustments if needed.
- Store Extra Layers Safely: If you plan to make multiple versions, keep the pieces in a dry, dust-free place to prevent damage.
Where to Find the Best Materials
Creating a high-quality 3D paper cutting light box depends not only on the template but also on the materials you choose. We recommend purchasing Encore Cardstock 80 lb cover 216 gsm for the best results. This cardstock is thick enough to maintain its shape and thin enough to allow for clean cuts. Click the link to visit the 12×12 Cardstock Shop and get everything you need for your project.
Final Thoughts and Encouragement
The Fairy Castle 3D Paper Cutting Light Box is more than just a craft—it's a journey into the world of art and imagination. By following the steps outlined and using the provided template, you can transform simple paper into a magical masterpiece. Whether you choose to hang it as framed art or illuminate it as a light box, this project is sure to impress and delight.
So, gather your supplies, dive into the details, and let your creativity shine. Happy crafting!