Creepy Eyeball 3D Papercraft: A Spine-Chilling Addition to Halloween Decor
If you're looking for a fun, creative way to elevate your Halloween decorations this year, the Eyeball 3D Papercraft might just be the perfect project. This eerie and eye-catching design brings a touch of horror-themed art into any space, making it ideal for haunted houses, costume parties, or even as a unique centerpiece on your mantel. With its simple construction and impressive visual impact, it's no wonder why DIY enthusiasts and Halloween lovers are flocking to this downloadable craft.
Why Choose 3D Papercraft for Halloween?
Halloween is all about ambiance, and nothing sets the mood like handcrafted decor. While store-bought items can be convenient, they often lack personality. On the other hand, papercraft allows you to create something that’s both custom and spooky. The Eyeball 3D Papercraft stands out because of its unsettling realism and easy assembly process. Whether you’re a seasoned crafter or new to the world of papercutting, this project is designed to be accessible while still delivering professional results.
Design Details and Dimensions
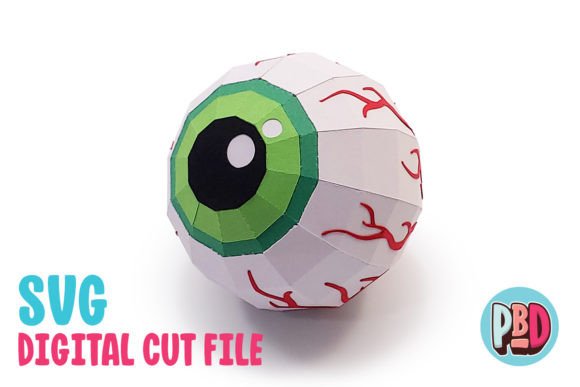
The creepy eyeball model is a cube-like structure with each side measuring exactly 3.5 inches in width, depth, and height. This compact size makes it versatile—you can place multiple units together for an even more haunting effect, or use one as a standalone piece. Its dimensions also mean it fits comfortably in most standard display areas without overwhelming the room.
Built using medium to heavy cardstock, the final product is sturdy enough to hold up through the Halloween season. Cardstock provides the right balance between rigidity and ease of cutting, ensuring that your finished piece looks sharp and polished. It's important to choose the right material; lighter paper may tear during assembly, while overly thick materials could make the cuts difficult or inaccurate.
What You Get with the Download
Purchasing the Eyeball 3D Papercraft kit gives you access to a comprehensive ZIP file containing everything you need to bring your spooky creation to life. Let’s take a closer look at what's included:
- SVG Cut File: Ideal for use with advanced software like Silhouette Designer Edition or Cricut Design Space. SVG files offer clean lines and precise shapes, making them the preferred choice for most users.
- DXF Cut File: Designed for Silhouette Basic Edition. While these files work well, they do require some setup adjustments to ensure they load properly.
- PDF Instructions: Step-by-step guidance to help you assemble your 3D papercraft with confidence. These instructions include tips on folding, gluing, and positioning each component for the best result.
All files must be extracted before use. Once you have them ready, you can begin crafting your very own chilling eyeball. Just remember, if you're using Silhouette Studio with DXF files, you’ll want to follow specific steps to adjust the import settings:
- Edit Preferences
- Select Import > DXF
- Open Settings
- Change from “As-is” to “Centered”
This ensures the file loads correctly and aligns properly on your cutting mat. Keep in mind that DXF files tend to open slower and may not be as crisp as SVG files, so if your software supports it, always opt for the SVG version when possible.
Software Compatibility and Tips
One of the key considerations when purchasing digital papercraft kits is software compatibility. The Eyeball 3D Papercraft is optimized for use with Silhouette Designer Edition and above, or Cricut Design Space. These platforms allow for high-precision cuts and are widely used among papercrafters and hobbyists. Other software options haven't been tested, so it's safest to stick with the recommended tools to avoid potential issues.
When working with SVG files, you'll find that they scale easily and retain their quality, which is especially helpful if you want to modify the size of your model slightly. However, the original measurements are already perfectly proportioned for the intended effect—any changes should be made carefully to maintain the design's integrity.
Assembly Made Simple
Once you’ve cut out all the pieces, the real fun begins. The PDF instructions provided are clear and concise, walking you through each step of the build. From scoring folds to applying glue in the right places, every detail is covered. The design includes tabs and slots that interlock neatly, reducing the need for excessive adhesive and helping you achieve a cleaner finish.
Begin by laying out all the components and matching them with the diagrams in the instruction manual. Fold along the scored lines and gently connect the pieces as directed. If you're unsure about a particular section, taking your time and referring back to the guide can save you frustration later. After all, the goal is to enjoy the process and end up with a satisfyingly creepy result.
Practical Uses for Your Creepy Eye Model
Now that you've created your Eyeball 3D Papercraft, where should you display it? Here are a few ideas to maximize its spooky appeal:
- Halloween Party Decor: Place the model on tables or hang it from the ceiling using fishing line or string. It adds an unexpected twist that guests will notice and comment on.
- Haunted House Attraction: Use several models together to create an eerie wall of eyes, or scatter them around corners and doorways for a startling surprise.
- Costume Event Prop: Attach it to a broomstick or mount it on a frame to use as a prop during trick-or-treating or at local events.
- Home Display: Add it to a bookshelf, behind a glass case, or near a candle for a subtle but effective Halloween vibe.
Its versatility makes it suitable for both indoor and outdoor displays, depending on how you protect it from the elements. For example, sealing the model with a spray varnish or placing it inside a plastic box can extend its lifespan significantly.
Customization Options and Creative Twists
While the design comes in a standard form, there's plenty of room for creativity. You can paint the eye with different colors, add metallic accents, or even insert LED lights inside to give it a glowing effect. Some crafters go a step further by attaching small strings or wires to make the eye appear to move subtly in the breeze.
If you're feeling adventurous, consider creating a series of these models and varying the colors or sizes to make a dramatic statement. Think of a cluster of eyes staring down from the top of a staircase or peering out from behind a curtain. The possibilities are endless when you combine the Eyeball 3D Papercraft with your imagination.
Time and Effort Considerations
Before starting your project, it's wise to assess how much time and effort you’re willing to invest. Depending on your experience level and the speed of your cutting machine, the entire process can take anywhere from 1 to 3 hours. That includes cutting, folding, and assembling all parts.
Here’s a breakdown of the typical timeline:
- Cutting the pieces (30–60 minutes)
- Folding and prepping for assembly (15–30 minutes)
- Gluing and final assembly (45–90 minutes)
If you're working with children or beginners, plan for extra time as mistakes can happen and learning curves vary. Still, the process is rewarding and can be completed over the course of a single evening or broken into smaller sessions over a few days.
Material List and Supplies
To get started, you’ll need the following supplies in addition to the digital files:
- Medium to heavy-weight cardstock (black or colored based on your preference)
- Acrylic paint or markers for coloring and detailing
- White glue or double-sided tape
- Ruler and bone folder for precise folding
- Silhouette or Cricut cutting machine with compatible blades
- Scissors or a utility knife for trimming excess
- Mounting hardware if you plan to hang the model
Some crafters prefer using foam board for added durability, but cardstock is the most common and cost-effective option. Be sure to check the full material list included in the instructions for specific recommendations and quantities needed.
Enhancing the Effect with Lighting and Placement
Lighting plays a huge role in making your Eyeball 3D Papercraft truly stand out. Try placing it under a dim red or green light to enhance the spooky atmosphere. Alternatively, you can use a flashlight to cast shadows across the walls, making the eye seem larger than life.
Placement is equally important. Think about where the eye will have the biggest impact. Corners of rooms, behind mirrors, or near entryways are great spots. The element of surprise is part of what makes Halloween so memorable, and a well-placed papercraft eye can deliver that jolt of fear effectively.
Common Questions and Considerations
Many people ask whether this project is suitable for kids. While younger ones can certainly assist with folding and painting, the actual cutting should be done by adults due to the precision required and the use of machinery. Always supervise young crafters closely and encourage them to wear protective eyewear.
Others wonder if the model is reusable. If handled with care and stored flat after disassembly, it can be reassembled next year. However, the adhesive tends to weaken over time, so you may need to reinforce it with fresh glue or tape.
Lastly, some worry about the difficulty level. In reality, the instructions are beginner-friendly and the design is structured for ease of assembly. As long as you follow the steps and take your time, you’ll end up with a professional-looking model that impresses everyone who sees it.
Getting the Most Out of Your Craft
To truly appreciate the value of the Eyeball 3D Papercraft, think beyond just a static decoration. You can integrate it into interactive displays, such as motion-activated lights or sound effects. Pair it with fog machines or strobe lighting for a nightmarish effect. The model can even serve as a base for other Halloween crafts, like mini graveyards or ghost silhouettes.
For those interested in group projects, consider hosting a crafting session with friends or family. Everyone can create their own eye and then collaborate on a larger installation. It's a great way to bond while getting into the Halloween spirit.
Final Thoughts on the Eyeball 3D Papercraft
Incorporating the Eyeball 3D Papercraft into your Halloween plans is a smart move. It combines creativity, simplicity, and spookiness into one package. Plus, with the flexibility of digital files and the support of detailed instructions, it’s a project that anyone can tackle successfully.
Whether you're dressing up a party venue or adding a personal touch to your home decor, this model offers a unique way to express your love for the holiday. And with proper care, it can become a yearly tradition that never fails to startle and delight. So grab your cutting machine, download the ZIP file, and let the crafting begin!